Wikiloc
Català:
Que és?
És una eina molt útil per si t'agrada fer rutes a l'aire lliure. Pots buscar rutes molt pròximes a tu o crear-les i penjar-les. Comencem!
Com funciona?
Wikiloc pas a pas:
1. Registrar-te. Has de crear-te un compte a Wikiloc per poder fer tot lo que et proporciona aquesta aplicació o eina. Clica el botó de la dreta i ompla-ho amb les teves dades.
2. Com trobar rutes a prop d'on estàs o d'on vius?
Has d'entrar a Wikiloc, al teu compte, i anar a on posa " Descobreix noves rutes". Posa el lloc on estas o on t'interessa i posa buscar. A l'esquerra tens un menu on pots posar filtres del tipus de recorregut que busques: kilometres, dificultat....
3. Com descargar-te una ruta?
Es molt fàcil. Fes click a la ruta que t'interessa i posa descarregar, just a sobre del mapa. Elegeix el tipu d'arxiu que necessites. Per defecte t'apareixerà un arxiu GPX per cargar-lo al teu GPS. Però tú pots descargar on vulguis, al mòbil, al GPS, al Google Earth....
4. Com buscar l'usuari que m'agrada per veure si ha penjat més rutes o les que té?
Si entres a Wickiloc no pots buscar directament un usuari. Primer posa buscar a la caixa " Descobreix noves rutes", i a la següentpantalla posa usuaris. Després posa el nom de l'usuari i busca'l.

5. Com pujar una ruta?
1- Si ja estàs registrat, clica "entrar" a dalt a la dreta i posa les teves dades.
2- Clica: "pujar rutes" a dalt a l'esquerra.un mapaa, semblant al de Googles Maps,
3- Tens dos opcions: cargar la ruta del teu GPS o fer tú la ruta manualment.
4- Descarregar una ruta des del teu GPS: en la pàgina t'indiquen els formats permesos i el pes màxim. Només hasde buscar la ruta al teu equip, i llest!
5- Crear una ruta manualment: Fes clic a "crear una ruta manual" i segueix les instruccions.
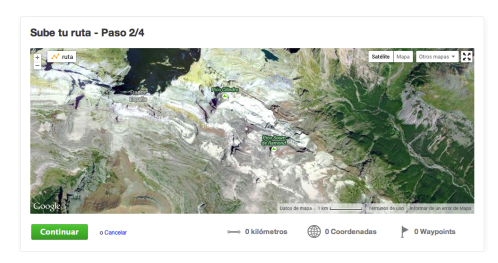
6- Introdueix la localització de la ruta.
7- Wickiloc troba el lloc i et mostra un mapa, semblant al de Google Maps, perquè marquis la ruta. Escull la vista que et sigui més cómoda: mapa, satèl·lit...
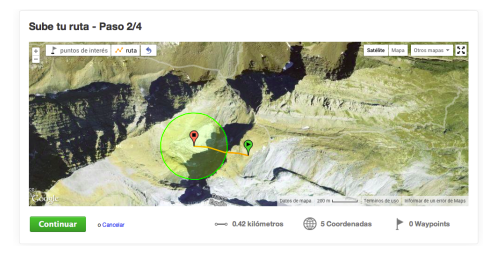
8- Dibuixa la ruta. En quant toquis el mapa ja es farà el punt de sortida. (globo verd). Fent click en el mapa aniràs fent la teva ruta mitjançant línies. El següent click tancarà la ruta (globo vermell). Ves fentclics fins finalitzar-la.
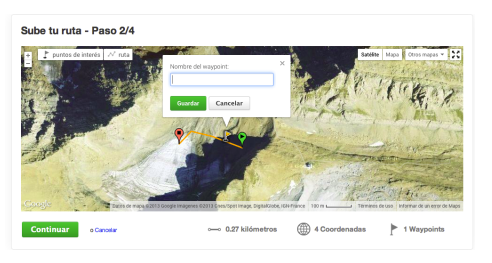
9- Marca els punts d'inetrès. Una vegada hagis acabat de dibuixar la ruta clicael botó de dalt a l'esquerra del mapa "punts d'interès" podràs marcar-los. Només has de clicar sobré la línia de la ruta on vulguis i posar-ne un. Et sortirà una pantalleta que allà li hauràs de posar nom.
IMPORTANT: Quan has guardat la ruta, ja no et deixa modificar el punts d'interès ni el camí, ho sigui, repassar-ho tot molt bé abans de penjar. Però et deixa canviar fotos i el nom.
10. Quan hagis acabat prem "Continua " a baix l'esquerra i omple el formulari . Nom , vista general, dificultat i tipus d'activitat.
A més pots pujar fins a 6 fotos . ( Et recomanem que ho facis i així les teves rutes seran més atractives per als usuaris i tindràs
millor mèrit.).

11. Si no has introduït cap punt d'interès prem " Finalitzar" , i ja està !

12 Si has introduït punts d'interès prem " Continua" Pots personalitzar cada way point prement " modificar" i omplint
el formulari de cadascún. Descripció, tipus de punt d'interès ... I per descomptat fotos . Pots afegir fins a 6 fotos per cada waypoint .
Després prem "Finalitzar " i ja està pujada la teva nova ruta!
English:
What is?
It is a very useful tool if you like walks in the outdoors. Look routes very close to you or to create them and hang them. Let's begin!
How does it work?
Donate step:
1. Register now. You have to create an account Donate to do everything that gives you this application or tool. Click the button on the right and fill it with your data.
2. How to find routes near where you are or where you live?
You entered yet, in your mind, and go to where it says "Find new routes." Put where you are or where to look interested and puts. On the left you have a filter menu where you can set the type of route you want: kilometers, difficulty ....
3. How do you download a route?
It is very easy. Click on the route you are interested in and puts downloaded directly above the map. Choose the type of file you need. By default it will appear a GPX file to load it to your GPS. But you can download anywhere, mobile, GPS, Google Earth ....
4. As for the user to see if I like more routes uploaded or you have?
If you enter Wickiloc can not search directly for a user. First put in the box for "Discover new routes," and puts següentpantalla users. Then put the name of the user Look for it.
5. How to upload a route?
1- If you are already registered, click "enter" on the top right and puts your data.
2. Click "Upload trails" at the top esquerra.un map, similar to Googles Maps
3. You have two options: load your GPS route or the route you do manually.
4- Download a route from your GPS: tell you the page format and the maximum weight allowed. Only hasde route for your computer, and voila!
5. Create a route manually: Click "create a route manual" and follow the instructions.
6- enter the location of the route.
7- Wickiloc find the site and shows you a map similar to Google Maps, to mark the route. Choose the most comfortable view: map, satellite ...
8- Draw route. As you touch the map will point it out. (globe green). Clicking on the map will take you by your route through lines. The next click will close the path (red balloon). Fentclics Skip to end it.
9- Mark inetrès points. Once you have finished drawing the route clicael button at the upper left of the map "waypoints" you can mark them. Just click on the line route anywhere and get one. We get a pantalleta that there will have to give a name.
IMPORTANT: When you saved the route, do not let you change the waypoints or track, it is, go over everything very well before hanging. But photos and let you change the name.
10. When finished click "Continue" below the left and fill the form. Name, overview, difficulty and type of activity.
Also you can upload up to 6 photos. (We recommend you do your routes and thus be more attractive to users and will best merit.).
11. If you have not entered a point of interest press "Finish," and you're done!
12 If you entered waypoints press "Continue" You can customize each way point by pressing "change" and filling
form each. Description, type of point of interest ... And of course pictures. You can add up to 6 photos for each waypoint.
Then click "Finish" and you're your climb new route!
Español:
Que es?
Es una herramienta muy útil para si te gusta hacer rutas al aire libre. Puedes buscar rutas muy cercanas a ti o crearlas y colgarlas. Empezamos!
¿Cómo funciona?
Wikiloc paso a paso:
1. Registrarte. Tienes que crearte una cuenta en Wikiloc para poder hacer todo lo que te proporciona esta aplicación o herramienta. Pulsa el botón de la derecha y rellena esto con tus datos.
2. Cómo encontrar rutas cerca de donde estás o de donde vives?
Tienes que entrar en Wikiloc, en tu cuenta, e ir a donde pone "Descubre nuevas rutas". Pone el lugar donde estás o donde te interesa y pone buscar. A la izquierda tienes un menú donde puedes poner filtros del tipo de recorrido que buscas: kilometros, dificultad ....
3. ¿Cómo descargar hacerte una ruta?
Es muy fácil. Haz click en la ruta que te interesa y pone descargar, justo encima del mapa. Elige el tip de archivo que necesitas. Por defecto te aparecerá un archivo GPX para cargar a tu GPS. Pero tú puedes descargarlo donde quieras, en el móvil, el GPS, en Google Earth ....
4. Cómo buscar el usuario que me gusta para ver si ha colgado más rutas o las que tiene?
Si entras en Wickiloc no puedes buscar directamente un usuario. Primero pone buscar en la caja "Descubre nuevas rutas", y en la següentpantalla pone usuarios. Después pone el nombre del usuario y búscalo.
5. ¿Cómo subir una ruta?
1- Si ya estás registrado, pulsa "entrar" arriba a la derecha y pone tus datos.
2- Pulsa: "subir rutas" arriba a la esquerra.un mapa, semejante al de Googles Maps,
3- Tienes dos opciones: cargar la ruta de tu GPS o hacer tú la ruta manualmente.
4- Descargar una ruta desde tu GPS: en la página te indican los formatos permitidos y el peso máximo. Sólo hasde buscar la ruta a tu equipo, y listo!
5- Crear una ruta manualmente: Haz clic en "crear una ruta manual" y sigue las instrucciones.
6- Introduce la localización de la ruta.
7- Wickiloc encuentra el lugar y te muestra un mapa, similar al de Google Maps, para que marques la ruta. Elige la vista que te sea más cómoda: mapa, satélite ...
8- Dibuja la ruta. En cuanto toques el mapa ya se hará el punto de salida. (globo verde). Haciendo click en el mapa irás haciendo tu ruta mediante líneas. El siguiente click cerrará la ruta (globo rojo). Cambiar fentclics hasta finalizarla.
9- Marca los puntos de inetrès. Una vez hayas terminado de dibujar la ruta clicael botón de arriba a la izquierda del mapa "puntos de interés" podrás marcarlos. Sólo tienes que hacer clic sobre la línea de la ruta donde quieras y poner uno. Te saldrá una pantallita que allí le deberás poner nombre.
IMPORTANTE: Cuando has guardado la ruta, ya no te deja modificar puntos de interés ni el camino, lo sea, repasar todo muy bien antes de colgar. Pero te deja cambiar fotos y el nombre.
10. Cuando hayas terminado pulsa "Continuar" abajo la izquierda y rellena el formulario. Nombre, descripción, dificultad y tipo de actividad.
Además puedes subir hasta 6 fotos. (Te recomendamos que lo hagas y así tus rutas serán más atractivas para los usuarios y tendrás
mejor mérito.).
11. Si no has introducido ningún punto de interés pulsa "Terminar", y ya está!
12 Si has introducido puntos de interés pulsa "Continuar" Puedes personalizar cada way point pulsando "modificar" y llenando el formulario de cada uno. Descripción, tipo de punto de interés ... Y por supuesto fotos. Puedes añadir hasta 6 fotos por cada waypoint.
Después pulsa "Finalizar" y ya está subida tu nueva ruta!